spandcompany stamps
spandcompany stamps
Sunday, January 19, 2014
Week 2 of PL
I went picture happy this past week! I have 5 pages for this weeks PL!!! 2 design G (front and back) and 1 design A (front). I am totally IN LOVE with the Project Life style of scrapbooking!! I also got all of my 2013 pictures printed out as well! I'm wanting to wait for some other core kits before starting on that album though. :) I did a little more embellishing this week. I think as time goes on and I get more comfortable, I will probably embellish more. Isn't that how everything works though? When we start something new and aren't sure how to do it? Enjoy the pictures! Supplies used: 4X6 cards are from Simple Stories-Sn@p "Everyday" and "Family"; Fancy Pants "Etcetera", "Swagger", and "Artist Edition Journaling Cards". 3x4 cards are SS-Sn@p "Snappy Days" and PL-Becky Higgins "Sunshine". For embellishments I used various buttons from SP&co, labels from 7 Gypsies, Viva décor pearl pens in Turquois and Sunny Yellow, stamps from SP&Co and an unlabeled stamp from Hobby Lobby, Punches from EK Success and Punch Bunch, a Hallmark napkin, gems from Magnolia, Paper Studio, Prima, and Colorbok, various washi tape from Scotch Expressions, Prima , & Tape Works, AND lastly stickers form EK Success.
I'm linking this up to Samantha's linky party at thescrapmaster.com
Sunday, January 12, 2014
Project Life
I have discovered Project Life! I didn't know what all the hub-bub was about but now I have a better understanding and I'm hooked!! I started my 2014 album last night!! I'm so excited to get pictures printed and get caught up on the past 10-12 years of memories! It's gonna be a fortune in photos lol but it will be so worth it. I tend to take pictures then never get them developed. But now with the ability to order prints straight from my phone, I have NO EXCUSE! I have been watching Samantha's (sp&co) videos on her PL process and all the different apps that she uses. So awesome! The "Collect" app really comes in handy! I don't have to worry about dates and with the caption, I can remember what was happening! This is definitely the way for me to scrapbook. I absolutely love traditional scrapbook layouts, but I spend way too much time on them trying to decide what materials to use (ribbon, die cuts, patterns, etc.) Y'all know what I'm talking about, I'm sure. With PL, I don't have to worry about that. And I can still insert a traditional layout if I want.
I don't plan on doing the full weekly layout like a lot of people do. Mine will be a mix of whatever is going on, whenever I have pics to show. But I am going to try to stay current on it. Hopefully every week, but I may have to miss a week here and there.
As far as the catching up....not sure where to start there.... Should I go backward? 2013, 2012, 2011, etc. or forward from 2002/2003? Hmmmmmmmm......
Well, here's what I've started with :) And yes, that is a picture of Gatorade and Puffs tissue. The point it to document "everyday life" and for a few days...I wasn't feeling so well haha!
I'm linking up to Sp&co's blog at thescrapmaster.com! Come check it out!
Tuesday, January 7, 2014
Bundle of Joy Mini Album
Okay! I got my craft room cleaned up by Wednesday afternoon (January 1st) and was inspired to start creating! I decided to make a mini album for my nephew. My brother-in-law has been stationed in Germany for almost two years now. He and his wife had their first baby last year and wanted to spend his first birthday in the States. So they are here and we get to meet him for the first time!!!! I made an album for his birthday gift. I used the echo park "Bundle of Joy" 6x6 paper pack along with a couple of coordinating 12x12 sheets and the journaling card sheet. I didn't have enough for everything so I also used a sheet of paper from My Minds Eye "Twinkle, Twinkle, Little Boy 12x12 pack and some miscellaneous sheets of paper from my stash used on the photo mats. I used some yellow ribbon from my stash (very old lol) and a few buttons from sp&co. I also used some stickers to spell out his name. After I took these pictures and uploaded them, I found the CUTEST stickers by Martha Stewart that a friend had sent me! They matched perfectly! I show them in an "additional" video on my yt channel.
The layout:
Each page (5 3/4 x 5 3/4) has a hidden pocket containing an extra photo mat measuring 5 1/2 x 5 1/2
Pages 1, 3, 5, & 7 have a magnet holding an extended flap closed
Page 2 has an extended flap that holds a photo mat (capable of holding a 3x5 photo)
Page 4 are the two tag pages
Page 6 has a waterfall photo mat - three mats that will each hold a 4x4 picture front and back
I finished it up on Thursday, just in time for maintenance to come investigate the leak in my closet. Which they finally fixed on Friday!!!! YAY!!!!!!! Enjoy the pics! :)
Tuesday, December 31, 2013
A New Year Gift
I'm on vacation this week. Trying to clean up in my craft room. A leak has developed in the closet, forcing me to pull everything out of there and re-arrange. In my milling around, I decided that I wanted to make something for new year's. I decided that I would make gifts for my husband to take to his fellow management team (since we don't really do Christmas and a lot of them sent little gifts to him). I wanted to make candles however I didn't have enough of one type of jar to make everyone the same (that's an issue for me lol). I finally decided to just make them for his store manager and the four co- managers. I prepared the candle in a nice 10 oz jar with two wicks. Then used some scraps!! I had lots of these little white tags cut from my cricut. I wrote the scent on them and tied them with some hemp twine around the jars. I had some scrap cream colored card stock laying about so I used it to make a small tag. I stamped the sentiment (from sp&co) and put a different colored button on each. The buttons also cam from sp&co - Teeny bikini, Hula Skirt, Summer Sunset, Walk the Plank, and Blue Lagoon. I took a plain white paper bag, folded it once, punched two holes in it, and closed it with some silver cord with the tag attached. And there you have it! A quick, simple New Year's gift!
Thursday, November 28, 2013
Happy Turkey Day!
It's Thanksgiving everybody!!! Happy Thanksgiving! I spent the day at my grandparents house with my son. It was wonderful!! One of my managers let me off work (even though it will be the biggest night of the year for us) I'm so blessed! Unfortunately my hubby still has to work so he didn't get to go with us. But we did get to have dinner with his family last night so he didn't totally miss out. :)
No crafts really to share today. I did crochet a blanket for my sister but I really just wanted to say Happy Thanksgiving!
Saturday, November 9, 2013
Kissing Hedgies Anniversary Card
My grandparents celebrated their 58th wedding anniversary this past week!! This is a card that I made for them. I used the "Kissing Hedgies" stamp by Tina Wenke at Sp&Co. I colored this adorable image with my copics. The design paper is from MME - Love Me. The paper is double sided of course so the "love" sentiment is the reverse side of the doily design. Everything is matted onto yellow cardstock and inked with purple chalk ink. The card back is 8 1/2 x 11 folded in half so it's a pretty sizable card. :) The sentiment is from a Sp&Co set- Mix 'n Match Sentiments:Occasions. I finished it off my adding some pearl drops in two corners using my Viva Décor Pearl Pen in Sunny Yellow.
Happy Anniversary Grandma & Grandpa!!!!
Demask Mini Album
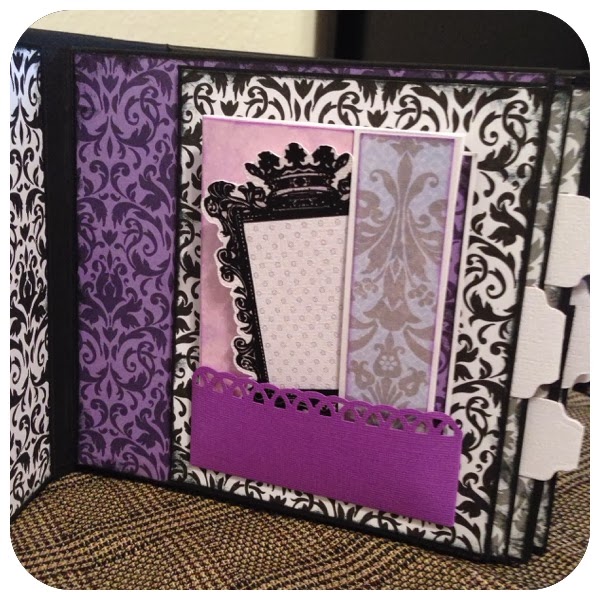
Hey everyone! I'm a week behind with posting this! This is an album I made for my friends daughter. It's a birthday gift for her! I was really happy with the way it turned out. She told me that she liked the black and white damask pattern and would like dark purple as well. She also likes chandeliers. I will list all the supplies then post pictures.
*The album was constructed using a tutorial on youtube from my sister's scrapper. Each page has an extension that folds out and is held in place by magnets. Each page also has a pull out photo mat.
*All of the damask paper and the black cardstock is from Paper Studio (Hobby Lobby). The inner covers are form MME-Lost and Found Portobello Road
*On the cover- flowers are from Hobby Lobby in the bridal section and I created the stick pin from assorted beads that I have in my stash. The chandelier die cuts on the spine and throughout the album are from my cricut imagine. Teresa Collins - Baby Boutique cartridge
*The tabs for the photo mats are from a Spellbinders die - Creative Page Tabs
*The tags are from a Sizzix Bigz Die- Tags# 3
*The stamps on the tags are from two sets. Inkadinkado- Chandeliers and Tim Holtz- Urban Grunge
*The "mini-mini" was created from a variation of a tutorial on youtube. I have the original video attached to my video of this mini. The paper used is from Recollections and from a Provo Craft stack-Soft Serenity.
Shown above is the first page that has tags inserted into the extension flap.
Page 3 has the "mini-mini" tucked into a small pocket
Subscribe to:
Posts (Atom)