Monday, June 30, 2014
Birdie birthday card
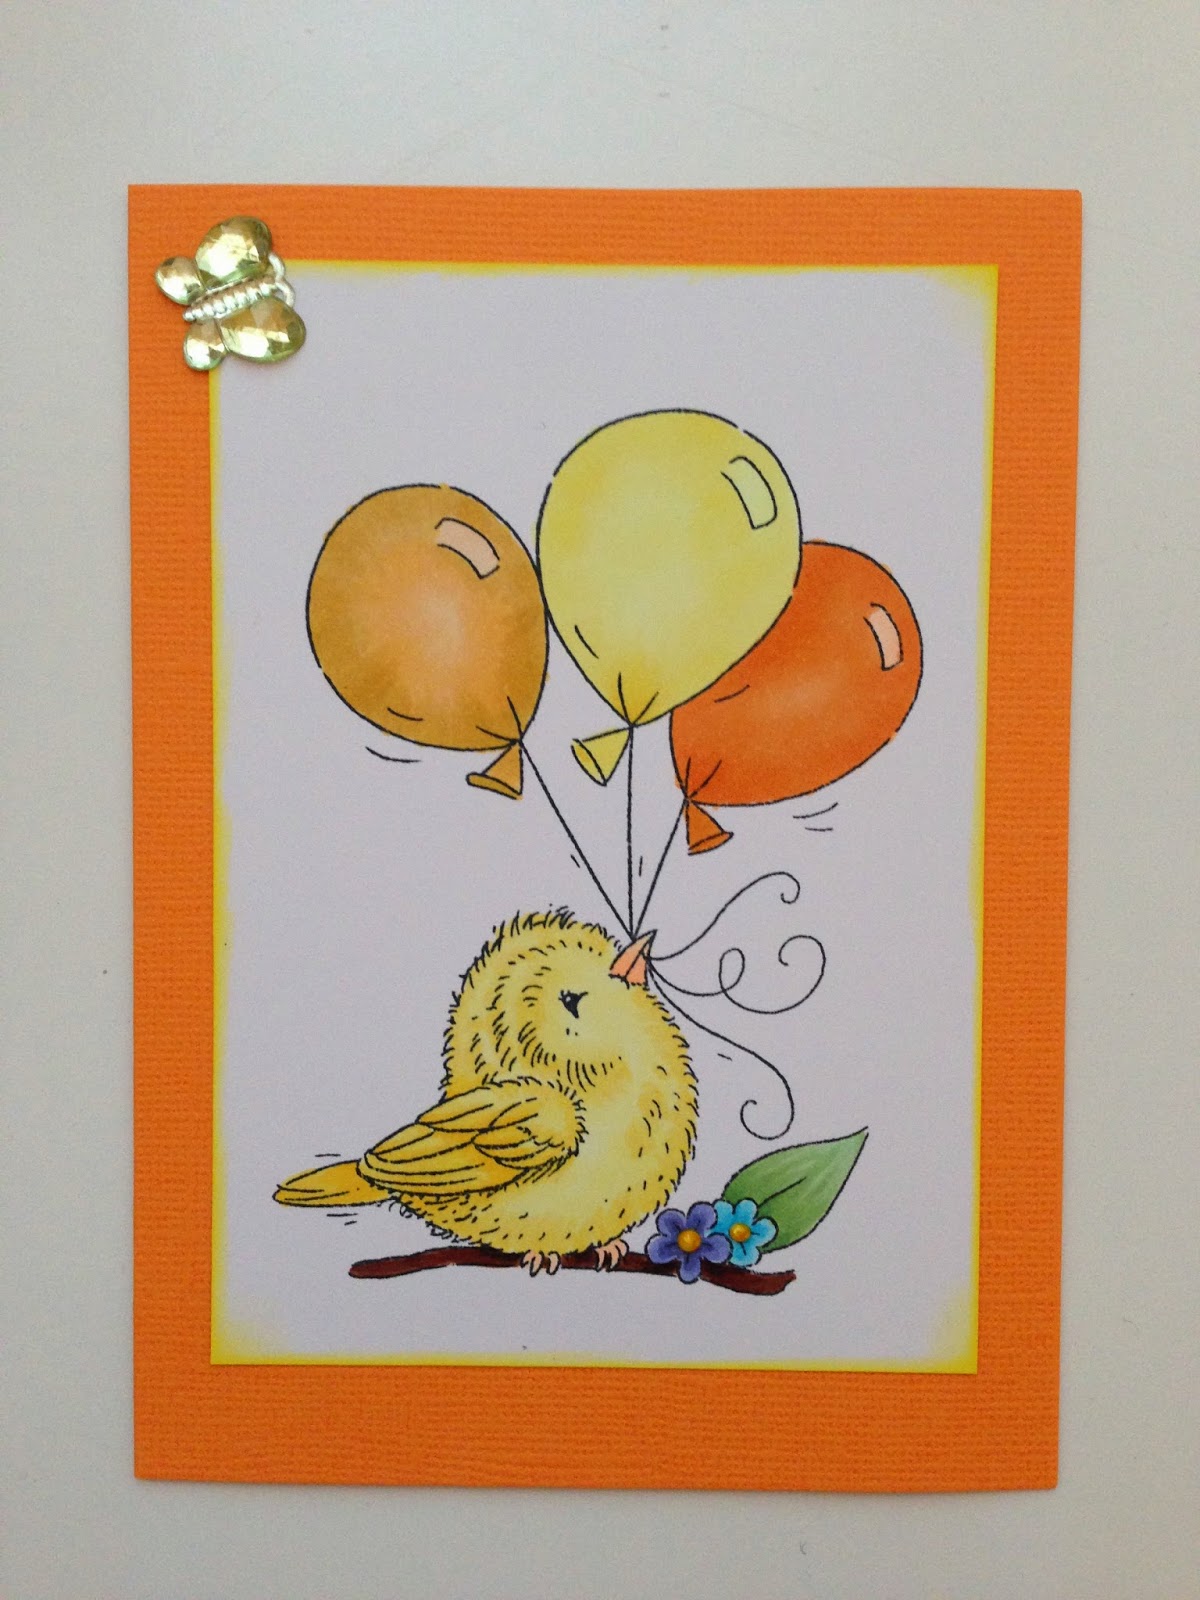
Another little project from my vacation! After finishing all of my Project Life layouts, I made this cute little card for an upcoming birthday! The image is from SP&Co: Bird with Balloons and is adhered to an orange card base. I colored it with my copic markers and will be submitting it for the bi-weekly challenge at MarkerPOP.com. I used the following colors: bird-Y11,Y15,&Y18 balloons-(1)YR20,Y23,&Y26 (2)Y00,Y11,&Y15 (3)YR82,YR12,&YR14 branch-E27,E29,&E49 flowers-(1)BV13&BV17 (2)B01&B04 leaf-G40,G43,&G46. I inked around the edges with yellow ink, used Viva Décor in Sunny Yellow for the centers of the flowers, and added a small glass butterfly. The sentiment is on the inside of the card. I wanted to keep this one pretty simple and not give it a lot of dimension. Cant wait to see what I can accomplish tomorrow! 
Project Life weeks 22-25
OMG! I'm all caught up!! So I'm on vacation this week and I'm enjoying every minute! I woke up at 6:30 this morning! (what the heck?) I was really excited to get into my craft room! I had started organizing last night before my husband and son asked me to come watch a movie with them. So I got up this morning, bright eyed and bushy tailed. I cleaned up the kitchen, vacuumed the entire apartment and went into my craft room. I made so much progress!! I finally got to point where I felt really accomplished and was happy to sit down and start scrapping. I mainly used my June Studio Calico PL kit. I'm embarrassed to say that today is the last day of June and I just broke the seal on my June kit today...I've been really busy. I didn't embellish a whole lot. I wanted to keep it simple so that I would remain focused on getting everything done. The first picture is of my cousins wedding on May 31st. I used an assortment of stickers from my stash for this layout. The next picture starts my weeks. Week 22 and 25, I used tab dividers to label them so I edited the picture to show the week number. I used an assortment of page protectors styles. In order they are: week22 (backside of) A and H (front & back), week23 D (front side), week24 (backside of) D and J (front & back), week25 F (front side). Hope you enjoy the pictures!


Monday, June 23, 2014
Project Life weeks 19-21
I was busy this weekend! I got a traditional layout done for Mothers day, using beautiful paper from MME, Bramble Rose. I created then title on my gypsy by welding letters together. I did the same with the shadow for the letters. I used my May SC PL kit (Camelot) for almost all of it, with the exception of two journaling cards on the back side of week 19. Those two came from the March kit (Office Hours) As far as embellishments, I used my SC kits, Viva Décor Pearl Pens, some flair and a stamp from SP&Co, and some washi. I also used my Wink Of Stella glitter pen. I'm not 100% caught up but I will be on vacation next week so my goal is to have EVERYTHING completed by Tuesday next week. That gives me plenty of time to work on them and get things ready for my nephews birthday party! I will post the pictures in columns. First row is 19, then 20, then 21(the last 3 pics). I hope everyone is having a great week! For a little more detail you can go to my youtube channel. I would link the video to this blog, but I don't know how! lol


Saturday, June 21, 2014
Altered Mason jars
Hey everyone!! I've had an amazing couple of days! Wow! I can't believe how wonderful the last few days have been! After working close to 60 hours in four days, I got an extra long weekend and just look at what I created! A friend of mine had shown me some altered mason jars on Pinterest that she wanted. She said she didn't want them just yet because she's unsure of what color she wants. I decided to make a couple just to make sure I could do it. They are each painted with a mixture of acrylic paint and modpodge. I took a sanding block and sanded off the paint from the raised lettering and a few spots around the jars (for a distressed look). I added a bunch of flowers from Michael's and Wild Orchid Crafts and in the case of the ivory jar, a stick pin that I received in a previous swap. I adheard two different colors of seam binding (also from WOC) around each lid and tied them into a messy, double bow. These jars could be used for storage, used as a decorative piece, or take the flat part of the lid out and you have a vase! I was so excited over the way these turned out! I am going to enter this in the Krafty Girls challenge, check them out kraftygirls.blogspot. com!


Wednesday, June 11, 2014
Birthday Beauty
I have a card share today! I made this card for a friends birthday. I'm super nervous because she is super amazing at copic coloring and an awesome card maker/scrap booker!! This image is Beauty, one of my Super Secret Stamp Club stamps from The Greeting Farm. I colored her with my copics. Skin - E0000, E000, & E00. Cheeks - E21. Hair - E35, E37, E39, & E18. Dress - RV52, RV63, & RV55. Shoes - RV63 & RV55. Rose - YR12, YR14, & G40. She's matted onto a small piece of cardstock from Prima: En Francais. And that mat is adhered to another piece of cardstock from that same stack. I use a sheer pink piece of ribbon from Hobby Lobby and tied it into a pretty bow. I inked all the edges with Tim Holtz distress ink in Victorian Velvet (except the actual image. I used orange ink to compliment the rose) and accented each corner with my Viva Décor pearl pen in Ice White. I also added it to her hair barrette. The sentiment is from a pack I got at Hobby Lobby and inked it in the same TH:VV ink. All of that is placed on a white, pre-folded base from The Paper Studio (Hobby Lobby). I left the inside blank and just wrote my own comments. I actually tried a little distressing on the back, just because I know she likes pink and teal. I didn't show the back though :) I really hope she likes it because as I said before she is a professional...and I most certainly am not lol! I'm also going to use this card to enter into the Krafty Girls challenge. Check them out at kraftygirls.blogspot.com and have a great day!!!


Wednesday, June 4, 2014
Project Life weeks 16-18
This is what I worked on all day Sunday! Well, besides laundry lol. I made myself go into my craft room, sit down, pull out my PL stuff and get after it! Let's get right into it! The first part of week 16 is a traditional layout (front and back) The front side shows the last day of our revival at church. I used a sheet of paper that my friend Julie had sent me as the base. All of the pictures are backed with craft cardstock. I used some journaling cards from the BH, PL core kit: elder edition that I embellished with my Viva Décor pearl pens -black, gold, & violet. All of the edges are inked with Tim Holtz DI: Walnut Stain and the title is made with foam stickers. The pictures of deviled eggs (for pot luck lunch afterward) were to show that I forgot about the water and they were almost boiled dry ~~oops~~ and that they were sliding all over the place inside that pan during the car ride lol! Below those are a picture of the Barney doll my niece left (he looks like he's rejoicing) and of our pastor introducing our guest speaker. The last picture on the layout is of our guest speaker who came all the way from Cali to speak to us, Ruben Zaragoza. He gave an awesome testimonial that I wrote on a journaling card and stuck behind the picture. I attached a pull tab on it. I should have thought that out better... now you have to pull out the entire layout to read it... eh. The next layout is pictures that I took while my friend and I walked at the park. I used a piece of paper from a paper pack by Studio G, backed all the photos on some textured orange cardstock and used Tim Holtz DI: Broke China to ink the edges. I didn't do a lot of journaling (just a blurb about the turtles) but did create a title by using a piece of scrap orange cardstock. It was already shaped like that and I really liked it! So I just wrote out my title with a purple Sharpie marker and popped it up an adhesive foam tape. I cut out a cute turtle and two adorable squirrels on my cricut with the Create A Critter cartridge. I cut the squirrels out on white card and colored them with my copics. The next layouts are all pocket pages. Two design A's front and back. I used a mixture of March, April, and May Studio Calico PL monthly kits. Along with some home made enamel dots, decorative tape, and a few other misc stamps. I felt sooo accomplished at the end of the night and as you can see, my Blue Heeler even got involved lol! The rest of this week I hope to work on more. I have all of my pictures and have them planned out in my PL planner... I just need to do it! :)


Sunday, June 1, 2014
Batter Up!
My cousin got married yesterday! She looked so beautiful! Her husband looked so.....overheated lol. Everyone else looked comfortable. As you can see in the last picture she got married on the pitcher's mound! I've never been to a wedding like this! It was pretty amazing. There was a little league tournament happening so they waited for a break in the game then unsuspecting parents got to see a wedding lol! How's that for a memorable occasion?!?! I created a mini album for their special day. There is a more detailed flip through on my youtube channel. There are photo mats and tags that I show on there that are not pictured here. However I do have a picture of the assemble charm here and I don't have on the channel. All of the design papers came from the Paper Studio (Hobby Lobby) except the inside covers. They came from a paper pack by Karen Foster. There are 2 pages with flaps, 1 page with a flap that houses and extra photomat, 2 plain pages, 2 tag pages, and an envelope page. I didn't embellish the pages, I just left them very plain. The charm is made up of bottle caps and a few dangles from Hobby Lobby. I'm sure you can tell that I get most of my supplies from HL lol. Of course the main charm with their last initial had an air bubble :( I tried to get it out but it wouldn't pop. I thought to myself, "It's real small and at the edge. It'll be fine." Nope... I guess when it settled, it got bigger. Oh well, it adds character, right?


Subscribe to:
Posts (Atom)